The first problem was that I had this great Container Store sorter. I loved it...at first. Then I had 3 little girls that kept getting their hands on it, cracked the top major trying to get into it, and then finally the youngest one found her way to opening it. Well, let's just say that mess took a while to clean up! (See pic below but be prepared for much snickering as well as "awwww"ing as this one is ADORABLE...annoying at this moment but adorable).


Idea #1: I originally planned to use the same containers under my medicine chest on either side of my faucet. However, as I lined them up there I realized I didn't like the look since I had an entire wall to the right of my door (small though it was) that only had a clock on it. (The wall is about the depth of the cabinet in our bathroom so quite small. The perfect size for idea #2.
Idea #2: Stack the two racks with containers on the wall so as to utilize the wall space better and still allow room for my counter items that would have been forced into retirement. Idea #2 it is!
Here's what you'll need: a hammer, screws (with anchors if you are not going into a stud), a screwdriver, level, pencil, painters tape, and a screw hole starter.

In addition, you need to purchase or up cycle some small shelving that will fit some glass containers (see images at end). I bought my glass containers and shelving from IKEA (it's pretty much my favorite store). Follow the directions for putting the shelf together and then move on to your wall.
Take the painters tape and run it across the back of the shelf. Use your pencil to mark where the holes are. Remove the painters tape and put it on the wall where you want your shelf to hang. (Remember that you mark where the top of the holes are and not the bottom otherwise your shelf will hang lower than you plan. Just a friendly tip from me to you. I may or may not have made that mistake in the past.)
Once you've line up the painters tape, grab your handy level and check it. Then check it again. And probably again. It's the old adage, measure twice, poke holes once...or something like that. ;)
Here's what it should look like as you line it up. Keep in mind my pics of this were after I hung my shelf so the glass jars are already on there and yours wouldn't be yet.

Add your anchors, then screws and pop on the shelf.
The next step is the fun one. Sort, organize and add all your hair supplies to your new, cute, glass jars. Add jars to shelf and voila!
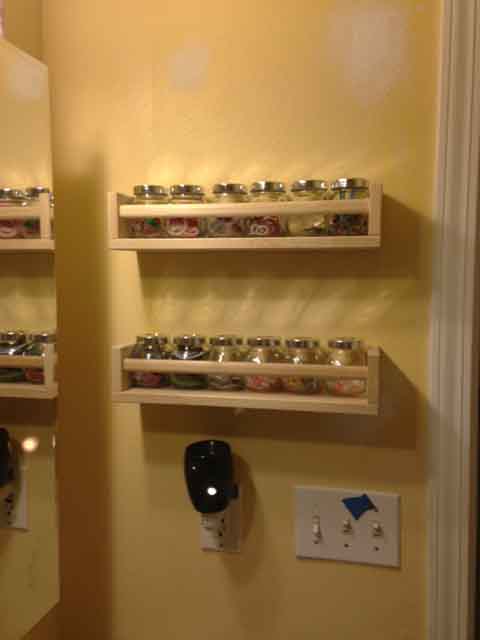
Okay so I was going to crop out the two white spots higher on the wall I decided to just let you see that we have more projects in the works. The reality is that we need to get more paint. I'm dreading that situation! How could I possibly find a perfect match? And I really don't want to repaint the whole bathroom...So, it stays white for now and I never notice it until I look at pictures. But, I digress.
Now I have a bathroom wall used more effectively and efficiently, hair accessories more easily accessible, and less junk to pull out from under the sink. What more could a girl want?
Well, actually a better solution for the leftovers...

Happy Creations! Jennifer
Please feel free to comment below.
No comments:
Post a Comment